
How to Prepare and Paint Your Home
- Justin Britz
- Mar 17, 2022
- 5 min read
Updated: Feb 13, 2023
So you’ve found your perfect paint colours and you’re one step closer to a beautiful room. Now comes the fun part! Here’s everything you need to know to get started with your paint project, plus our top tips on how to paint a room.
PREPARATION:
Proper preparation is the real secret to a flawless paint finish. Prepping for your paint job might feel tedious and time-consuming, but once it’s done, the rest will be a breeze.

GATHER YOUR TOOLS
A professional-looking paint job requires premium tools. Top quality paint and painting supplies will help you achieve the best results with less effort, so you can tackle your paint project like a pro. The higher the quality, the better the results! Here’s everything you need:
Plastic Drop Sheet (we choose Hamilton’s drop sheets available in various sizes)
Painter’s Tape
Angled Paint Brush
Mini Tray
Premium Paint Roller
Paint Tray
Extension Pole
Crack-filler (Polyfilla Interior Crack Filler)
Primer
Enamel Paint for trims (we always choose Plascon Velvaglo)
Premium Wall Paint of choice (we love Plascon Double Velvet or Cashmere)
Ceiling Paint
Dust cloths for clean up
Ladder (For reaching high places)
Stirring Stick


PREPARING YOUR SPACE
Move furniture away from walls toward the centre of the room. Remove any art, nails, hooks, light switch plates, doorknobs, and outlet covers from walls.
Protect floors and furniture with a drop sheet. If you’re painting ceilings, you’ll need to protect your entire floor. Secure the edges of the drop cloth to the floor with tape to keep it in place.
Use Painter’s Tape to protect your trim, as well as to protect your ceilings when painting walls, and vice versa. Apply your tape starting from the corner of a room, pressing down on the edges firmly to seal so paint doesn’t bleed through.
PREPARING YOUR WALLS
Painting over dirty or oily surfaces can cause the paint to chip or flake off, and cobwebs in the corner can cause the paint to ripple. Putting in a little extra prep time will pay off in the end and provide longer lasting results. Here’s how to do it:
Sand over any rough spots or peeling paint using a 120-grit sand-paper.
Fill any nail holes or blemishes with Polyfilla Interior Crack Filler. Once dry, sand until smooth.
Wipe down your walls to remove any dust, dirt, grime or debris. A little warm water and mild soap on a large, slightly damp spongewill do the trick. This will ensure a better bond between the surface and the paint.

GETTING SET TO PAINT
Give your chosen colour a good stir before pouring into your paint tray.
Even if the paint you’re using is low-odour, we still recommend opening windows (if weather permits) to keep air flowing, and running an oscillating fan on low to help your paint dry faster. Try to avoid painting if it’s super-hot or humid. Humidity will make paint dry slower, so you definitely don’t want windows open if it’s too muggy.
PAINT Painting may seem like a no-brainer, but there’s actually a certain level of skill required to get the most flawless finish. Here’s how to get the most professional finish:
PRIMING If you’re painting over a higher gloss finish or a darker colour, or you want to minimize imperfections on your wall, we recommend using a good quality Primer first and always doing two coats for the most professional look. If you’re painting over previous good quality, similar coloured walls you will not need to prime.

CUTTING IN Before you roll paint onto your walls, you want to “cut in” using an angled brush. This allows you to get into areas that are too tight for rollers, such as around baseboards and trim, and the edge where the wall meets the ceiling. To load your paint brush, dip the bristles about a third of the way into your paint, and gently tap it against the sides to remove excess paint. Brush should be fully loaded but never dripping. Start in the corners and apply your paint by dragging the tapered edge of your brush in a straight line using gentle pressure so the bristles flex slightly. Use a downward stroke when painting vertically or sideways strokes if you’re painting along the edge of the ceiling, baseboards or other horizontally-oriented trim. Once you’re happy with your line, use quick, back and forth strokes to feather out the edge of your cut in area, which helps paint blend seamlessly when you move on to the rolling step.
PAINTING CEILINGS Always paint your ceilings before your walls, allowing your ceiling to dry for 24 hours before painting your walls. Starting from a corner, use your angled brush to cut in a three to four inch wide section around the perimeter of the ceiling where it meets the wall. Next, start rolling onto the ceiling while your cut in section is still wet. Work quickly in small sections, rolling forward then backward. When rolling a ceiling, roll across the room in one consistent direction. When rolling your second coat, work in the opposite direction.

PAINTING TRIM Paint doors and window frames before painting baseboards, and all trim before painting your walls. Use your angled brush in long, smooth strokes with gentle pressure along the length of your trim. To minimize brush marks, work your brush back and forth, starting your stroke from the dry area, working back into the wet area. After your final coat, remove tape and let trim dry thoroughly for 24 hours before painting your walls.

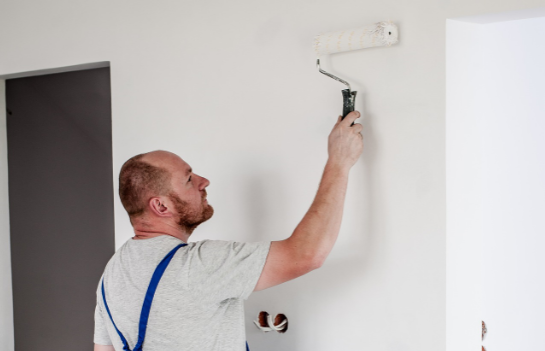
Roll the paint onto your wall starting close to the ceiling. Use long, diagonal strokes in a W-shape pattern so that your current paint stoke slightly overlaps with the stroke right before it. This is called keeping a “wet edge”. Just like it sounds, keeping a wet edge simply means that the edge of the painted area should not be allowed to dry, so you’re never painting wet paint over dry paint. This helps ensure a really even, consistent paint job. Keep your roller well loaded and resist the urge to push the roller into your wall. Too much pressure will create streaks and compress your roller fibres, making it more difficult to reload. For best results, apply two coats of paint.

DRY AND RE-COAT TIMES
Times will vary, but most water-based products should be dry to the touch in 30-60 minutes. Recommended recoat time for water-based wall paint & trim paint is 2 to 4 hours, and recommended recoat time for ceiling paint and primer is 1 to 2 hours High humidity or cool temperatures may result in longer dry and recoat times. Always read and follow instructions on the paint pack.
CLEAN-UP
High-quality tools should last some time, but it all depends on how you care for and store them after each paint job. Clean brushes and roller covers using soap and warm water until the water runs clear. Once clean and dry, place your brushes back inside the brush jacket to help keep their shape. Pour any leftover paint back into the can. Once the paint in your tray is completely dry, toss the liner in the trash for easy clean-up.

REMOVING TAPE
Remove tape approximately one hour after painting your final coat, when the paint is just dry to the touch. Remove tape by gently tearing it off at a 45-degree angle.
STORING PAINT
To store leftover paint, tightly close your paint can using a rubber mallet (a hammer could dent the can and cause air to seep in) and store in a cool, dry place.
If you need to dispose of any paint, follow your local paint disposal regulations, and never pour paint down a drain.
For a free Quote on painting please call 074 132 9766

Comments